Tuesday, May 17, 2011

Hi-Ho Cherry-O

Hidey Ho! Now I know I've been working on my kitchen for forever months but life is busy. I'm sluggishly making progress and thought that Thrifty Decor Chick's Spray Paint Linky Party would be the perfect time for me to add some splashes of color to the kitchen revamp. With all the blue, white, and gray going on in the kitchen it's been feeling a little cool in there. I'm going to be incorporating some nice wood tones eventually but I wanted some splashes of color to warm it up too!

Well, hello beautiful!

I debated between red and yellow for a while but finally decided to go with red. It'll pack the punch that I'm looking for. What is I'm spray painting exactly?


The hardware!


Now, I love Oil Rubbed Bronze as much as the next person but I wanted something different. Something a bit more retro/vintage/whimsical but most importantly fun! Perhaps the inspiration came from this picture I found eons ago when admiring other kitchens. I love the pops of red. Granted there isn't red hardware but there is a red stove!


I was too chicken to do all the knobs so I started with two from some of the cabinets we removed. I wanted to make sure I was going to like it before plunging into painting all of them.


(Sorry for the horrible picture but I don't have time to take another right now!)

I applied a couple of light coats of red and allowed ample time to dry. Then I replaced the knobs on two of the cabinet doors.


I plan to live with them for a week before I do the rest but so far I'm digging it! What do you think? Is red cabinet knobs too crazy or is it right up your alley?

[image[7].png]

Sunday, May 15, 2011

I love free stuff!

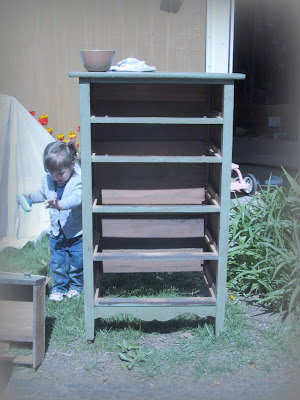
I may or may not have mentioned this but I am extremely cheap! Last weekend my wonderful hubby scored me a free lingerie chest. Booyah! I was/am pretty pumped. I've started sanding but that's it. Here are a few pictures to tide you over until I'm finished.


She's a little rough around the edges but I like a challenge!

Hope you're having a lovely weekend! :)

Tuesday, May 10, 2011

Scrapbook Inspired Bridal Shower Invites

Hello, hello! I just wanted to share some photos of the invites I'm working on for my Besties' bridal shower. I still have to complete the back but I'm loving the way the front came out!


I'm hoping to finish them and their coordinating envelopes tomorrow night! I have to mail them out by the end of the week so I need to get my booty in gear!

I hope you're all having a great week! :)

Sunday, May 8, 2011

An Impromptu Hiatus

I can't believe it has been two weeks since I have written a single blog post. I hadn't planned on not writing anything it just kind of happened. I was working on cleaning and painting and catch up on laundry and spending time with my family. I was trying to put less stress on myself since I had been feeling so worn out. However, I plan on getting back into the swing of things this week. I may not be posting five times a week because I have come to realize that those are unrealistic expectations for myself. I have a full time job and I have a family. I do not have the luxury of being a full time blogger even though I would like to.

In other news, today was Mother's Day. I had to travel for work on Friday and Saturday so it was wonderful to be home all day today and relax. It was also nice to receive this wonderful gift from Jeff and my little lady....


Now I just need to learn how to use it! Happy Mother's Day to all the wonderful Mothers out there!

Monday, April 25, 2011

Review: Rustoleum's Countertop Paint

Yesterday during my parent's Easter gathering I was talking with my cousin about the Countertop Paint that I used a while back. After talking about it with him I figured now was the perfect time to do a little review of the product.


I am 90% happy with my decision to paint the counters. However, there is 10% that wishes that I had just left it as it was. What is the reason for the 10%? Spots that look like this…


While I never expected perfection from a $20 can of paint I am slightly disappointed that I have a handful of spots where the paint has come off. This could be my own fault though. On the can it says to lightly sand really glossy surfaces. I didn’t. Our counters really weren’t that glossy but perhaps I would have had better adhesion if I had.

I also made the mistake of emptying my dishes and leaving them to sit, unmoved, on my newly painted counters for a week after painting them. The paint didn’t come off but there are visible rings like this…


While I’d rather not have the small flecks of the old counter showing through I do have the option of touching it up with the leftover paint I have from the project. I, also, am happy to say that my painted counters have completely solved my problem of forgetting to use a cutting board! Woohoo!

While the counters most definitely are not perfect, I'm happy that I painted them. I’d rather have an imperfect counter in a color I love then an ugly counter in perfect condition.

If you’re thinking about tackling this project yourself I would recommend sanding any surface regardless of how glossy it is. (Do as I say, not as I do people!) I think it would definitely help to keep from getting little marks in your surface. Also, make sure you wait the 3 days that is recommended prior to use. I was tempted several times to just go ahead and use them but I waited and I’m glad I did. Overall, I would use this product again if I am ever faced with ugly laminate counters and a tight budget.

I'm linking this over to Centsational Girl's Paint Linky Party. 

Thursday, April 21, 2011

Bridal Shower Inspiration

100 days from today is my BFF's wedding. I'm so excited for my bestie and I'm thrilled that she chose me to be her Matron of Honor! Her bridal shower is approaching rather quickly so I have been scouring the blogosphere for inspiration and ideas. The shower is being given by myself, her mother, grandmother, and bridesmaid. I have been left with the responsibility of decorations, favors, and invitations. All the fun stuff if you ask me! So far here are some inspiring images that I have found and plan to incorporate into the shower.


I'm really liking the paper doily idea. The above picture is actually a wedding program but I think I'm borrowing the idea for the invitations.


Then to tie in some of the decor with the invite I'm considering stringing up some of these cute garlands.


The shower is being held in a barn and I want to keep everything rustic and green feeling. Some DIYed stump charges fit right in. I also plan to recycle some wine bottles for vases.


I stumble across these adorable fabric flowers along with a ridiculously easy tutorial. I haven't tried it yet but it really does look so simple. I'm thinking burlap favor bags of chocolate embellished with fabric flower brooches.

I'm having so much fun coming up with ideas! Hopefully within the next few days I can get my tushy in gear and make some tangible progress on everything.


Wednesday, April 20, 2011

When It Rains It Pours

Lately we have been having some home mishaps around these parts which have me feeling overwhelmed, frustrated, and defeated. A couple of weeks ago our furnace bit the big one. Luckily, we were able to hook up our water to an electric hot water heater that was already in the basement and we can run our wood stove to keep the house relatively warm. However, we will be saving our pennies all summer so we can pay cash for a new furnace before the cold weather returns.

On top of our furnace breaking down we have also been having issues with our septic. Last week I went downstairs to do a load of laundry and was surprised with a utility sink full of water that was overflowing onto the floor. After an hour of lugging buckets up the basement stairs and dumping them out the Bilco Doors we had the water cleaned up. Jeff snaked the pipes and it seemed as though a certain little someone may have flushed something she shouldn’t have. It may have been tissues, baby wipes, or doll cloths. We weren’t sure but everything seemed to be functioning properly once again.

Over the weekend Jeff went to my parents to help put in new hardwood floors in their bedroom. After they ripped up the carpet it became apparent that the simple floor install would not be so simple. Whoever built my parents house had not laid the sub floor properly. For obvious support reason, seams of sub floor should lay on the rafters. These seams didn’t, plus they were dry rotted. Hubby, my father, and my brother spent the weekend replacing the rafters, installing a new sub floor, and then, finally, the hardwoods. An afternoon job for two turned into a weekend job for three. On the bright side, my parents have beautiful new floors in their bedroom and do not have to worry about falling through their floor.

Monday night I was trying to be productive in the kitchen and sanded all the Spackle. I was cleaning up the dust and went to the basement to get something. I didn’t even make it to the bottom of the stairs and could see water on the floor.

Oh. Em. Gee. I thought I was going to cry. I had forgotten that I was supposed to be taking it easy on running water. In the midst of me trying to be productive I had done a load of laundry, ran the dishwasher, gave Charlie a bath, and took a shower. I completely over did it. Imagine my guilt when Jeff got home and had to help me clean up the disaster mess I made. I told him what I did and apologized and he responded with “Things happen. The floor needed to be washed anyway”. He’s a saint. He could have easily been mad at me but instead we spent some quality time sucking and moping up water, rearranging our basement to remove things from the water, and cleaning the floor.

Tuesday morning he snaked our drains again and we thought our problem was solved. No such luck. Currently we can not run water in our house which makes my productivity basically zero. Here's to hoping Jeff can fix it in the morning and I will no longer have to go to my parents to shower, eat, do laundry, and basically live.

What household mishaps have you had lately?

Monday, April 18, 2011

How To Paint Without Taping!

As I've mentioned , I repainted my living room a couple of months ago. When I went to the Home Depot to gather supplies for the job I found this cute little brush....
It's called a 2 inch Angle Sash Brush and it's made by Wooster. I picked it up for under $6!

This is, by far, my favorite paintbrush ever! With this little brush you have way more control than with a normal paintbrush because of the short flexible handle. I was able to paint 95% of my living room without taping. (The other 5% had to be taped due to lack of elbow room) What a time saver! Taping has always been my least favorite part of painting so if I can get by without doing it I will.

Next time you're getting ready to paint a room I'd highly suggest picking up one!

Friday, April 15, 2011

My Marie Antoinette Inspired Chair Makeover

For months I have used this chair at my desk...


I bought it for $5 off of Craigslist with the intention of painting it. Finally, one night, I decided to dive into the project. First, I mixed my own shade of pink with acrylic paints I had laying around the house. Then I watered it down and dry brushed it on. (For those who aren't familiar, dry brushing means wiping most of the paint off of the brush. Once I was done it looked like this....


Next, I did another layer of dry brushing with a watered down version Martha's Rainwater paint that I am using for kitchen redo.


At this point, I was frightened. I had this picture in my head but this wasn't it. I knew I wasn't done but I couldn't stop thinking of cotton candy, mermaids, and the movie Marie Antoinette. I wasn't sure I liked that. When I went to bed that night I planned on starting over the next day but in the morning I decided to finish what I had started since I wouldn't be wasting anything other than my time if I didn't like it.

So the next day I carried on with Plan A by applying yet another layer of dry brushed, watered down paint. This time I used Glidden's paint right off the shelf with no tint added.  


By this point I think my hubby thought I was crazy (I know, what else is knew!) but I continued on with glazing. I rubbed on Minwax's Dark Walnut stain and wiped most of it off. Then I sanded it lightly to give it a distressed finish.

After, I was done painting the wood I moved onto the caning. For this I used a sample of Valspar's Lincoln Black that I had laying around. By this point I was clinging to the idea of Marie Antoinette. I always loved the decor and fashion in that movie so why not stick with it.

Once I was done painting, glazing, and sanding I had one more step. I needed to cover the bottom of the legs where they had been chewed by the previous owner's puppy. This wasn't something that wood putty was going to fix so I decided to cover them with fabric. The fabric I used was a soft pink corduroy that I hot glued to the chair and then reinforced with black upholstery tacks. My tacks are FAR from perfect but I did it last night at 11:30 and was frustrated by the whole process. Normally I would have used needle nose plies to hold the tack while I used the mallet it to hammer it in but I couldn't find needle nose pliers. Typical. I did my best and here is the end result.


Overall, it's good enough for me. It's not perfect but neither am I. We'll make great friends. Maybe someday I'll fix the tacks or maybe I won't. Who knows!


I'm linking this over to Miss Mustard Seed's Furniture Feature Friday. Have a great weekend!

Wednesday, April 13, 2011

The Green's Dreams and Kitchen Progress

Happy, happy Wednesday my lovelies! I don't know about you but I am oh so very happy that the weekend is approaching! Today I want to share something with you. Actually, I want to share someone with you. This is one of my Besties, Marie. Oh, and that handsome guy that happens to be in the picture with her is her beau, Jake.


Marie is the blogger behind The Green's Dreams. She has recently joined the blogging community to share her home ideas and projects. This girl is truly beautiful inside and out. Quite possibly one of the nicest people I've ever meant. I really couldn't say enough good things about her. She is a blast to be around and especially talk design with! I feel completely privileged to have her as a friend and on top of that her and I are in the planning stages of some joint projects that I hope to share with you all in the near future.

In the meantime, I would love it if you would give Marie a warm welcome into the blogging community and drop by her blog.


In other news, I'm making progress on the kitchen! Woohoo! Not much but some. Last night I had every intention of sanding and painting but I couldn't find my sanding block. Boo! Then I was going to do some caulking but had a mishap with my caulk. After that I gave up. It felt as though I was not meant to get any work done so I forfeited. However, I did snap some pictures to share with you...


Slow and steady wins the race, right?


Someday it will be finished. For now we live in chaos. And yes I know that in all this time it would seem that I should have accomplished more but there have been some set backs that I will share with you when I'm finished. Perhaps by then I won't be as frustrated by the whole thing. (Here's a hint: My patience is as thin as the paint I used on the cabinets.)

I hope you're all having a lovely week!

 :)


Tuesday, April 12, 2011

My Strange Design Obsession

I'm not really sure why, but lately I keep looking for ways to incorporate chicken wire into my home decor. Yes, I said chicken wire. I first saw it on one of my favorite blogs, Under the Sycamore. Ashley's work is truly amazing and inspirational. Here is a picture of her chicken wire wall...


An entire chicken wire wall is a bit much for me personally, but on a smaller scale I'm totally loving the texture it creates. I'm contemplating using it in two different ways in the near future. First, I'd like to take a section of Charlotte's playroom wall and cover a framed section in chicken wire to use for displaying her artwork.


The second way that I'm considering using the chicken wire is for a hanging jewelry organizer. I don't have a ton of jewelry but for the little I do have I think it would look great displayed on framed chicken wire.

What are your feelings on chicken wire? Would you incorporate chicken wire into your home decor or is it too quirky for you?

Friday, April 8, 2011

My Grandfather's Desk

Short and simple today folks. A couple of weeks ago my parents dropped off this beauty to me...


It's my grandfather's desk. They don't have the room for it so I graciously volunteered to house it. I love it. I love having something that belonged to my grandfather.


I had planned on completely refinishing it but I don't quite have the time right now. Instead, I'm just going to clean it up and have a glass top cut for it. I think I may do a fun design under the glass too. Maybe with scrapbook paper or wrapping paper. We'll see.


I'm linking this over to Miss Mustard Seed's for Furniture Feature Friday. Stop on over to see all the entries!

Wednesday, April 6, 2011

Cha-Cha-Changes

Hello, hello! Not much to share today. I'm working on finishing up my desk chair that I have been working on this week but it's not quite ready! Here's a sneak peek though!


In other news, you may notice that I made some changes to the blog. Since beginning my blog, I've been trying to decide on a "look". I'm very indecisive but I'm really thinking that I like how it's looking right now or at least the direction it's heading. However, I'd like to hear your input! Which do you like better? My blog header now or the one from before? For those of you that are first time visitors this is what the header use to look like...


Let me hear your thoughts! Do you like the more generic header or personalized with pics? I should also mention that if I stick with the current design I will be hopefully adding some more pictures in my sidebar! So leave me some comments with feedback! I'd love to have your input!

As always, thanks for dropping by! I hope you're having a great week! :)

Tuesday, April 5, 2011

Craft Room Inspiration

While I’m desperately trying to finish my kitchen cabinets I have been dreaming about my next room overhaul. We live in a four bedroom house and currently only put three of them to good use. Two are used as bedrooms and the third is my girl’s playroom. The fourth bedroom is located directly off of the loft/office has been a landing place for random junk. With starting this blog I have come to realize that I need a space just for working on projects. This is the perfect space since I do most of my blogging in the office.

Instead of using this room as a place for abandoning items that I don’t feel like finding a home for I’m going to turn it into a workshop/craft room. I want this to be a room specifically for being creative. My friend Marie and I plan to collaborate on projects and this room will more than likely be the first of many. I can’t wait to see how it turns out but in the interim I’m compiling ideas that are cheap and fun! Here are a few places that I’m pulling inspiration from.


Yum! I can't wait to get started! What would/does your craft room look like?

Monday, April 4, 2011

Raining on Sunday

Actually didn't rain at all this Sunday but some of the painting I did around the house made me think of that song. I finally bought the paint for the kitchen! It's called Rainwater by Martha Stewart. After painting our living room with her color called Salvia I think I am hooked! Both of these colors are so beautiful. I haven't had a chance to paint the kitchen walls yet but there was one place I was able to test it out. Remember this?...


This is what the inside of the cabinet looked like after the recommended two bond coats. Obviously that wasn't going to cut it. After realizing that I was going to have to do five coats on the cabinets (Yes, I did say five!) I decided to paint the inside of the cabinet a color rather than using my bonding coat from Rustoleum's Cabinet Transformation kit. Here's how the inside of the cabinet is looking now.


I l-o-v-e it! In my eyes it reads a bit blue, green, and gray which is exactly what I wanted. I can't wait to see it on the walls but there are a few things that need to be down before that can happen. I've made a lot of progress on the cabinets. Most have all five coats but need the protective coat still. Once I've applied the protective coat I'm going to take on the walls. I'm anxious to see how the brick wall looks once it's painted!

What do you think of my new colored cabinet? Have you tried Martha's paint line yet? I hope you had a lovely weekend!


Thursday, March 31, 2011

Project Idea Overload

I’m feeling burnt out today and rather unaccomplished. I didn’t get anything done last
night which is frustrating to me. I’m also frustrated by the number of ideas that I have in
my head that I haven’t had time to do. Maybe sharing my ideas will make me feel better.
Here we go…

My Haphazard List of Ideas

  • Make a work table using slab doors and sawhorses
  • Paint Charlotte’s playroom door with chalkboard paint
  • Make shelves with yardstick
  • Paint and decoupage my office chair
  • Create a gallery wall in the living room
  • Make decoupage letters for the kitchen
  • Strip, paint and stain or bedroom dresser
  • Make light out of antique window
  • Make a wooden crates for kitchen
  • Learn to sew a cloth doll
  • Make a reading tent in Charlotte’s playroom
  • Hang sheer curtains in our bedroom and move our bed
  • Remove and create my own labels for our spices
  • Finish my drop cloth curtains
  • Make pillows for our couch
  • Paint all of our hallways gray
  • Paint our full bathroom white and oval/round Oil Rubbed Bronze mirror to replace the matchy, matchy rectangular wood one.
  • Remove closet door in master bedroom and replace with a curtain
  • Staple chicken wire to the ceiling of the work shop
  • Paint the purple office wall with chalkboard paint
  • Make felt flowers for the lamp shades for the lamps that I purchased last summer that I still have not painted
  • Make stump chargers for my BFF’s bridal shower
  • Make hand stamped jewelry
  • And the list goes on and on and on and on…..

Please do not be confused. I’m not saying all of these are good ideas but rather just
what pops into my head on a daily basis. I apologize if I have passed any of my anxiety
on to you by allowing you to read my inner ramblings. Maybe if I can just get my kitchen
done I can work on some of these other ideas…..
What ideas have you been thinking about today?

PS – Happy 1st Birthday to my adorable godson Cooper!


Isn’t he the cutest?

Tuesday, March 29, 2011

DIY Library Bag


About a month ago I took Charlotte on her first trip to our local public library. It was a total success and she loved looking at all of the books and picking out a few to take home. When it was time to check out the books, Charlotte wanted to carry them to the car. I didn't have a bag so the librarian handed us a plastic bag. My girl carried the bag all the way to the car. I knew I needed to have a special bag for our library trips. At the same time that we began going to the library, Charlotte began painting. I thought this would be a great opportunity for her to put her own personal touch on something. I bought some acrylic paint, cheap paint brushes, and a canvas bag and let her go crazy.

I taped plastic bags down for a drop cloth. I always have an excessive amount and thought this would be a good way to reuse them.

Here's my girl at work. Sorry it's blurry. I was having issues. :)

After she was done with her "masterpiece" and it had plenty of time to dry I sparingly applied some hot glue around the top edge of the bag and attached some ribbon. I truly wanted this bag to be something that Charlotte had "designed" so on a trip to Hobby Lobby I had her pick out a spool of ribbon that she liked and that was the ribbon I used.

Once I had attached the ribbon I decided that I wanted to add an inside pocket to keep our library card in. For this step I used random pieces that I had laying around. I used fabric and ribbon that was left over from my Memo Board, a random button, Charlotte's ribbon, and some hemp cord. I forgot to take pictures as I went but I basically just hot glued ribbon around the edges so that I wouldn't have to sew anything. It wasn't until I was done with the ribbon that I decided to add the button. The card didn't fit as snug as I would have liked and I was afraid that it would get lost.


I'm so proud of the art work that my peanut creates and love being able to carry it around. Not only does it make me smile but it also makes my girl happy. I love hearing her say things like "Mommy, I did that." I want her to be proud of the things she creates and I definitely think that allowing her to carry her painting around with her will help build her self confidence.


 What crafts have you done with your children lately?


Monday, March 28, 2011

Crafty Spring Cleaning

When I say Crafty Spring Cleaning I'm not sure if I mean crafty as creative, or crafty as in cleaning my craft box. Maybe it's both. When I visited Centsational Girl today and saw that she was hosting the Fair Weather Forum I knew I wanted to participate but didn't have anything "Spring" in mind for today. All day long I kept trying to come up with something and couldn't. Perhaps I was too distracted by the complete and utter disaster that is my dining room turned cabinet painting room. Yes, I am still painting cabinets. Anyways, after racking my brain all day I pulled out my craft bin hoping that I had supplies to make something spring like.


My craft box has been nagging me for months. Every time I would go to work on something I would buy new supplies because I wasn't sure what I actually had and didn't have the time to sort through my bin. Honestly, it was atrocious but Charlotte was asleep and I couldn't go to the store so I had to pull it out. After one glance it hit me. Spring Cleaning my craft bin was the perfect idea. I had a post to link the the Fair Weather Forum and I got to organize my bin so I no longer have to ignore it and pretend it doesn't exist.


Within five minutes of starting I found things that I didn't even know were in there. I'm pretty sure this fusible webbing and Heat 'n' Bond are my Mothers but I may have to find a use for them. I'm actually interested to see if they still work because they look pretty dated. Time will tell.


Any who, after digging everything out and sorting, I had a dining room table (in my living room) that looked like this. Oh and you even get to see the dining room disaster that I mentioned. My house is seriously chaos at the moment. I'm not sure how much longer I can take it. The plus side of me feeling annoyed with the clutter is that I'm picking up speed with painting because I just want to be done with the cabinets.


Now you may be wondering why I would think that this may be crafty as in creative. Well, once I had emptied the contents of the bin I realized that I needed to organize the junk supplies somehow before dumping them back in. While redoing the kitchen I have come to realize that I have too many plastic containers for leftovers. I needed to get them out of the kitchen but didn't want to get rid of them because I find them to be rather useful. I kept my good Rubbermaids in the kitchen and re-purposed our saved take-out containers for craft organizers. Perfecto! As you can see I feel rather clever that I used take out containers for organizing. I'm sure I'm not the first one to do it but let's not burst my bubble.


I'm feeling much better about getting this bin organized. Now I just need to finish this darn kitchen so I can move on the spare bedroom (soon-to-be project room). Once that's complete my supplies won't even need to live in this bin! I swear, there just aren't enough hours in the day to get everything done!

If you haven't noticed already I'm linking this post to CG's Fair Weather Forum. Stop over and check out all the wonderful entries!

How's your spring cleaning coming along?